Why it matters
Making cord shows how individual fibers become a continuous structure. This is a seated, non-load-bearing craft exercise for supervised beginners using known purchased flax fiber. The outcome is a labeled 20–30 cm teaching sample with visible ply direction, one fiber addition and a drying observation. It is not a replacement for rated rope in a wilderness kit.
What you’ll need
Tools
- Ruler, scissors used under supervision
- Labeled tray and pencil
Materials
- Known purchased prepared flax fiber, free of unknown treatments
- Small bowl of clean water if the fiber requires dampening
- Drying label
Before you begin
Safety & limits
- Do not strip live bark or collect unknown/regulated plants. Prepared purchased flax avoids a harvesting and plant-identification exercise.
- Use no flame for finishing and no fiber in the mouth. Stop at skin irritation, dust sensitivity or hand pain.
- Do not use sample cord for shelter in dangerous weather, rescue, climbing, lifting, towing, animal handling or any critical load.
Work carefully, in order
The method
- 01
Prepare the labeled fiber bundle
Spread a small handful of prepared flax on the tray. Pick out short loose fragments and align the longer fibers without cutting them all to one length. Record supplier/material and whether used dry or lightly damp; do not soak into a dripping bundle. The prepared sample starts around 40 cm long with enough loose fiber reserved for an addition. Lengths describe this exercise, not a minimum strength specification.
- 02
Create an off-center start
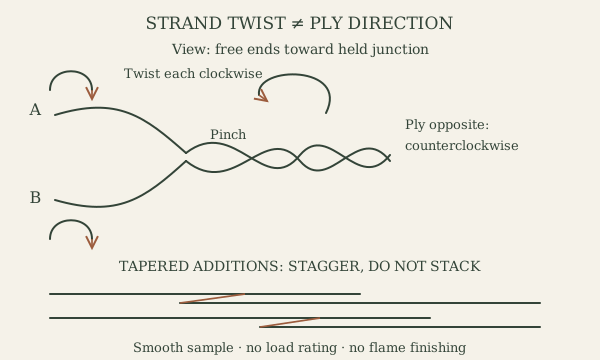
Hold the bundle away from its center so the free ends will be unequal. Twist a short section until it wants to kink, then let it fold into a small two-ply start. Pinch the junction between finished cord and free bundles. Mark the bundles A and B on the diagram; their names follow the material even when their positions exchange. If fibers snap instead of bending, stop and select a more workable prepared sample.
- 03
Separate strand twist from ply movement
Looking from the free ends toward the held junction, roll a short section of each bundle clockwise, then cross the bundles counterclockwise around one another. These are different motions: twist within each strand, opposite lay between strands. Advance the holding fingers to the new junction after each small cycle. Use the diagram’s stated viewpoint; do not alternate the rule when a strand changes from upper to lower position.
- 04
Add fiber before one end disappears
With an uneven end approaching, taper the replacement fiber into the thinning bundle rather than inserting a blunt wad. Work an overlap through successive twist-and-ply cycles while the other strand remains continuous. Make the two additions at different positions. Inspect for a smooth gradual change in thickness and tag the splice location; if a lump prevents even ply, undo this short unloaded section and redistribute the fibers.
- 05
Finish without burning or rating
At 20–30 cm, secure the end with a small temporary tie or clamp and let the sample dry with its label. Compare diameter, gaps and stiffness before/after drying; do not burn off fuzz or measure a breaking load over a suspended weight. A small hand flex can reveal an obvious opening or slipping addition, but cannot establish a working load or certify reliable shelter cord.
- 06
Compare and repair the teaching sample
Photograph or sketch a short even section and one failed section. Identify whether opening came from same-direction ply, lost junction tension, short fibers or a bulky addition. Rework only a short part, keeping the same viewing direction, and label both outcomes. Completion means the learner can show the two opposite motions and a staggered addition while explaining sourcing and limits. Keep the sample for demonstration, dry and unloaded.
Mistakes to avoid
- Twisting strands and laying the plies in the same direction
- Losing the pinch at the junction
- Ending both strands at the same place
- Calling an attractive sample rated rope
If it isn’t working
The cord opens as soon as it is released
Check opposite twist/ply motions from the stated viewpoint and maintain the junction pinch. Repeat a shorter section; more pulling force does not correct wrong lay.
The addition slips or becomes a hard lump
Use longer tapered prepared fibers, stagger the additions and redistribute bulk. Mark the failed joint for the teaching comparison; never compensate by assigning a lower invented working load.
Then & now
Historical context
Norm Kidder’s practitioner article, first published in The Bulletin of Primitive Technology in 1996, describes two-ply hand cordage and staggered fiber additions. Separately, Bandelier’s NPS account documents Ancestral Pueblo yucca rope and sandals. This purchased-flax teaching sample follows general two-ply mechanics; it does not claim to reproduce Pueblo practice or a universal Indigenous method.
The modern equivalent
Commercial cord with documented construction and rating replaces an untested natural-fiber sample for working loads.
Sources & review
Editorial draft — specialist review pending. Written 2026-10-06. Sources support the stated scope; this page has not been professionally certified.
- Norm Kidder — Making Cordage By Hand (1996) ↗
Practitioner account of opposite strand twist and ply, uneven ends and tapered fiber additions. Our short flax sample and inspection log are educational adaptations; no strength claim is made. Checked 2026-10-06.
- NPS Bandelier — Yucca ↗
Ancestral Pueblo use of yucca fiber for rope and sandals; provenance only. The purchased-flax exercise does not reproduce that regional tradition. Checked 2026-10-06.
- NPS — Leave No Trace Seven Principles ↗
Durable surfaces, respect for land rules and leaving natural material in place. Permission is required for any material demonstration. Checked 2026-10-06.